Golfaria FAQ and Map (page 2)
The Fun Walkthrough For Beginners
Golfaria can be challenging to get into. The controls can be challenging to learn, and until you start collecting items, restarting can feel very frustrating.
The purpose of this walkthrough is to guide new players to collect abilities that will open up the game, increase their stroke count so they can explore for longer, and make movement easier. This walkthrough assumes you have at least tried to play Golfaria and therefore have a basic understanding of the movement mechanics. This walkthrough will NOT guide the player to the end of the game, nor will it focus on collectibles or secrets!
Each section will give you directions (referencing holes using the Overworld Map). In addition it provides steps to increase your stroke count and the best checkpoint to use as you move through the game. If you are struggling with basic controls, you can find tips in the FAQ section. A couple of very important tips are to always use the Look function to check your surroundings and to only worry about small shots, half shots, and 3/4 power shots, there are almost no scenarios where you absolutely need a full power or specific power shot.
Part 1: Essential Abilities
Ability 1: Ball Breaker
Directions to the first ability
- Checkpoint at Calm Cave A
- Head directly North from the Waking Hole until you hit the fence, then shoot right until you’re near the bottom of the tall slope with a tree at the top, then aim just to the left of the tree and use a 3/4 power shot to get up there
- This area is relatively safe and easy to get to, so practice your power shots to get a sense of the controls
- Get Golf Club in Calm Cave B
- From the checkpoint in Calm Cave A, use your launch to land just below the row of bushes next to the fence, so that you can make your next shot straight up and into the bounce flower. Make a half-power shot to jump over the river, then line up and shoot into Calm Cave B
- Calm Cave B will take 4-7 shots; use the sandy patches to control your power and avoid falling into a pit or down a slope
- Once you get the golf club, reset the game to return to Calm Cave A
- Get Golf Club in Gur Grotto A (Optional)
- From the Calm Cave A hole, launch left, then cross the bridge. On either side of the bridge are two small hills with a bush on top; move to the flat space between the left hill and the large hill with the Parbot sitting on top. From between the two hills, shoot south, banking off of the larger hill’s slope. You’ll see the Gur Grotto A hole
- Inside Gur Grotto A, shoot with full power up and slightly to the left. With luck you’ll end up with a single shot between you and the golf club
- Reset and return to Calm Cave A
- Get Golf Club in Mount Mulligan A
- You can do this two ways; either head straight up to the zig-zaggy peninsula and make a full-strength shot to glide across the water, or go back to the area between the small hill and the big hill, and shoot directly North
- Either way, once you’re across the water, take a light-to-half shot into the small recessed area then shoot up into Mount Mulligan A
- Inside Mount Mulligan A, you’ll get the golf club in 3-5 strokes
- Watch out for the mushrooms, they can bounce you down the long slope at the bottom before you’re ready!
- Checkpoint at Mount Mulligan B
- From the spot where you got the last golf club, head left then down the big slope to reach the Mount Mulligan B Checkpoint Flag
- If possible, head straight down! If you go down the long slope at an angle, you might accidentally touch the exit before you get a chance to tap the Checkpoint Flag, and once you leave, you can’t re-enter Mount Mulligan B (you’ll see why once you leave)!
- Exit at Mount Mulligan B
- From the spot where you got the last golf club, head left then down the big slope to reach the Mount Mulligan B Checkpoint Flag
- Go to Tee Temple B
- From Mount Mulligan B, launch to the upper left, but be sure to launch so that you end up on the left slope. The top slope is likely to steer you into a water hazard
- Once at the bottom of the slope, head left under the bridge until you reach the entrance to the Tee Temple
- Navigate Tee Temple B > Tee Temple C > Tee Temple D > Block Breaker!
- You see Tee Temple B in the Demo. Don’t do what they do! Just use several half-power shots to line up until you get to over the small hill to the right of the entrance. From there use a full power shot to get into the sand, then pitch into the Tee Temple C exit
- Tee Temple B > C should take around 6-10 shots, C > D can be done in 3-4 shots thanks to the divots, and D > the Block Breaker can be done in 3-6 shots
- Once you collect the Block Breaker, DO NOT RESET your game!
- Get Golf Club in Tee Temple D
- From the spot where you collected the Ball Breaker, use a couple of short shots to go back the way you came, then bank along the slope to get around the pit, but don’t exit just yet!
- If you accidentally touch the Tee Temple D exit, it’s easy to launch against a barrier and go back in
- Make a full-power shot aiming down and to the right of the NPC ball; you’ll break through a row of blocks and collect a golf club. Once again, DO NOT RESET your game! Instead, exit via Tee Temple D, launch towards Tee Temple C, and shoot your way down the front of the temple
- From the spot where you collected the Ball Breaker, use a couple of short shots to go back the way you came, then bank along the slope to get around the pit, but don’t exit just yet!
- OPTIONAL: Get Golf Club in Rooted Route A/B
- From the Tee Temple, head south to Rooted Route A (this is a one-way hole, but you can leave via Rooted Route B or C). Use a full-power shot to smash through the bushes; as long as you aim well, you will enter the hole
- Note: If you look closely, you can see the hole underneath the bush; aim accordingly!
- Once in Rooted Route A, aim directly left and make a full-power shot. Don’t worry about the worms, they won’t interfere, and a good full-power shot will line you up perfectly
- Use the divots to jump over the pit, and collect your golf club! Then use the divots to head back
- From the golf club, you can reach the Rooted Route C checkpoint either by staying in the underworld and heading back past where you entered, or by exiting at Rooted Route B and travelling the Overworld to Rooted Route C If you’re low on strokes, the Underworld may take 1-2 fewer strokes than the Overworld
- From the Tee Temple, head south to Rooted Route A (this is a one-way hole, but you can leave via Rooted Route B or C). Use a full-power shot to smash through the bushes; as long as you aim well, you will enter the hole
- Checkpoint at Rooted Route C
- From Tee Temple, head south to Rooted Route C; you will need to use higher power shots to smash through the bushes
- This walkthrough assumes you are going to start from this checkpoint to collect the next ability
Ability 2: Brakes
Directions to the second ability
- Get the Golf Club in Rooted Route E
- If you haven’t already, get to the checkpoint at Rooted Route C
- From the checkpoint, head left then down until you see the Rooted Route D exit. DON’T LEAVE YET!
- Use your Brick Breaker Ability to head right, down the slope to another golf club!
- DO NOT try to get the golf club directly south of Rooted Route D unless you have the Sand Roll ability
- Don’t worry about the mosquitos that attach to you; you should be in and out before they do too much harm, and if they leech all your strokes, it’s fine because the checkpoint is just around the corner
- Exit out of Up ‘N Over Cove A
- Once you get your golf club, continue right, then down, then right again until you reach the Up ‘N Over Cove A exit. Don’t worry about the golf club directly south of the exit, you can’t reach it from here
- Get to Wise Ball’s Cave for checkpoint
- From the Up ‘N Over Cove A hole, launch down and to the right, just below the short fence. From there take a light shot to get past the water directly south of you, then use a full-power shot to get over the small hills and south (between the water and the long fence)
- You should see some sand and striped grass (the rough). A few pitches or light shots should get you to the Wise Ball’s Cave
- NOTE: You will be making your attempts to get the Brake ability from this checkpoint. If you’ve collected all of the golf clubs, you should have 35 shots; this should be enough to get to the Brakes with a minimum of attempts
- Go to Mushroom Slope A
- OPTIONAL: get the Parbot then go back to the Wise Ball’s cave to refresh your strokes
- Try to get to Mushroom Slope A using 8 strokes or less
- Exit Mushroom Slope B and enter Sunken Slowdown
- Take light shots through this stretch; the mushrooms will punish powerful shots! if you’re close to the slopes here, a half-power shot will get you up the slope without a lot of leftover momentum
- Try to get to Mushroom Slope B using 10 strokes or less
- If you exit Mushroom Slope B with fewer than 10 strokes remaining, reset and try again
- If you have 10 or more strokes but you aren’t confident, there is a Birdie (+5 strokes) in the bushes directly below the hole; as a bonus, you can use a full-power shot, as hitting the birdie will stop you in your tracks and line you up for a nice easy half-power shot to get up the slope
- Get the Brakes!
- From the Sunken Slowdown entrance, try for a 3/4 power shot aiming at the slope approx. 1 ball’s distance from the mushroom (either side could work); this should get you past the mushroom and past the water; mind the bugs!
- Line up to the left of the bounce flowers, and take a half-power shot to bounce over the pit; there is a ramming beetle, but you can avoid it by aiming a little off-center and some luck (plus, if it misses you and falls into the pit, you get +4 strokes!)
- Grab the brakes and luxuriate in your newfound super power!
- Go ahead and reset the game to get back to the Wise Ball’s cave
NOTE! Once you collect the the second ability, exploring the world becomes MUCH more enjoyable! At this point you may want to consider skipping the rest of the walkthrough and exploring on your own. You can always return to the designated checkpoint and return to the walkthrough at this point if you like!
Part 2: Extra Abilities
Ability 3: Sand Roll
Directions to the third ability
- Get Golf Club at Up ‘N Over Cove B
- Checkpoint at Winding Wetway B
- Go to Seafoam Lie A > Seafoam Lie B
- Go to Wet Sand Way and get Sand Roll
- Checkpoint at Bunker Below B
Ability 4: Water Roll
Directions to the fourth ability
- Checkpoint at Bunker Below B
- Go from Bunker Below B > Sandy Scoot A
- Go from Sandy Scoot A > Sandy Scoot B > Sandy Scoot C > Sandy Scoot D
- Go to Waterball Way and get Water Roll
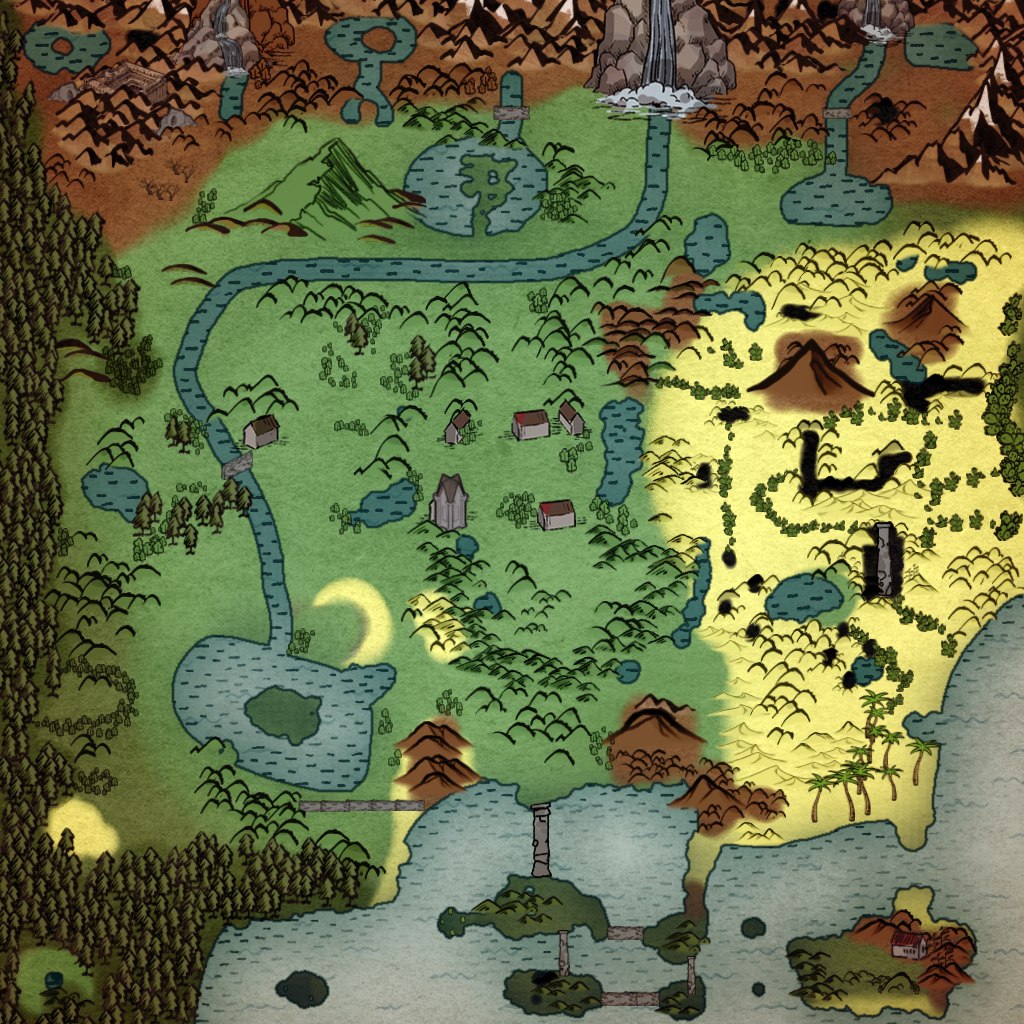
Map
- Overworld
- Underworld
This is supremely useful, thanks!